
Hollywood-Style Green Screen Removal
|
|
When we dream of using green screen for a video project we often envision all those behind-the-scenes videos that accompany the latest Hollywood blockbuster. They show some scene with tons of green screens everywhere and then magically wipe across the frame and reveal the finished shot. That quick wipe glosses over a tremendous amount of work and makes it all look effortless.
The bottom line is that we have high expectations after seeing special effects laden movies and virtual sets on the news and network sports shows. Then, software and hardware companies sell us on the idea that green screen is an easy low budget shortcut to Hollywood-style results. But like those behind-the-scenes documentaries, they leave out a lot of important details.
Details are important because getting them wrong destroys the green screen illusion and takes people out of the story.
What most people do is drop a green screen behind their subject and shoot like they normally shoot. Then, they drop the clip into their editing software add a chromakey effect, sample the background color and maybe tweak a few settings. With great source footage that perfectly matches the planned background and a high quality chromakey plugin, this CAN produce a acceptable results. But more often it results in an unsatisfying mess.
Check out these related articles:
The Ultimate Green Screen Resource Guide
How To Setup a Home Office Green Screen Studio
Become a Home Office Video Lighting Instant Expert!
Green Screen Paint – How to Pick the Right One
How to Build a YouTube Channel and Publish Videos That Get Views
6 Easy Ways To Improve The Sound of Your Videos

The Hollywood Green Screen Process
Hollywood does green screen differently. First, they use much higher quality materials for their screens plus cameras and storage systems capable of capturing huge amounts of detail. Then, they use very refined software tools to extract the elements from the green screen shots and composite them together to create those amazing results.
All those things cost money, so they are hard to replicate without a big budget. But, you can copy their process.
Step 1: Breaking Down the Shot
Hollywood special effects artists don’t create the key for a green screen shot in one pass. The settings that look good for the edge of a shirt may not work for fine wispy hair or translucent objects. Also, the only things that really matter are edges. There is no point wasting effort keying out empty sections of a green screen. So it’s best to quickly eliminate the pixels that don’t count and focus on the important details.
Most editing software allows you to create and animate a mask that will quickly let you remove large portions of your shot where there are no foreground elements to worry about. This process is called creating a garbage matte. This should be step one of your process.
Some software tools will also allow you to create a core matte. This is an area inside the foreground portion of your shot where there should be no transparency.
Combining a core matte and a garbage matte will allow you to focus all of your energy on the edges.
Particularly difficult shots may need to be further broken down by using custom settings for separate portions of the foreground subject and then adding together the results to create your final key.
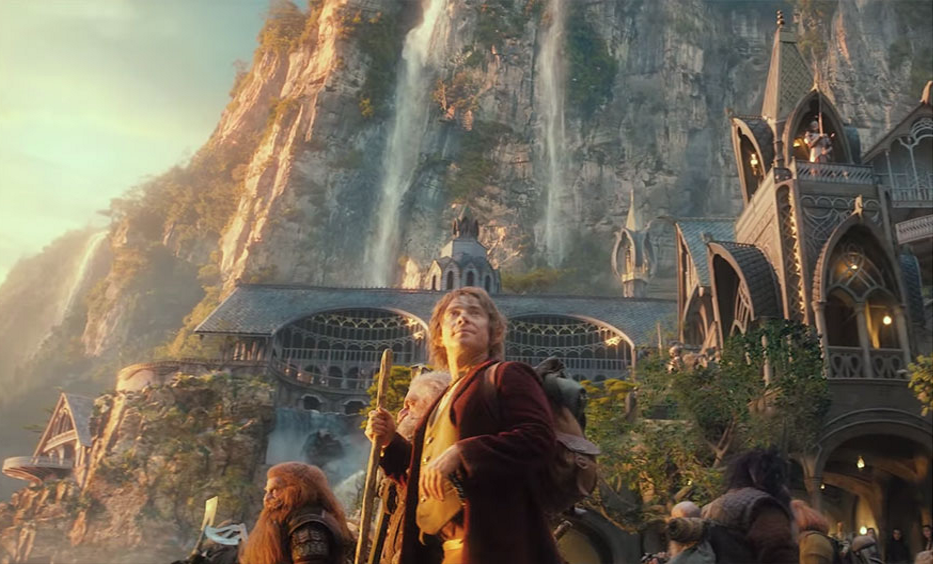
Finally, there are some times when the keying software just can’t get the job done. Maybe a portion of your foreground subject moves past the edge of the green screen (like the image from The Hobbit shown above.) In that case you have to rotoscope. Rotoscoping is the process of hand drawing a mask, frame-by-frame, to isolate your subject from the background. This is a tedious process. There are special tools that can make it easier to do, but it still takes time. But, if you have a really difficult key and you want Hollywood results, rotoscoping is a powerful tool.
Be prepared to work for Hollywood results.
Step 2: Color Correcting to Match Footage
There are two dead giveaways of amateur green screen work. First is that the coloring of the foreground doesn’t match the background. Second is that the edges don’t blend very well and make your foreground look like a cutout.
The solution to the first problem is color correction. First, you should use the spill removal tools in your software to remove the effect of any light that bounced off your screen and tinted the color of your subject. Spill removal tools have gotten very sophisticated and tend to do an excellent job of removing color tints. Next, adjust the tone, saturation, contrast, and color balance of your foreground so that it blends with your background. This can go a long way toward creating a convincing composite.
But, even if you nail the color correction, you can still end up with edges that are too bright or dark for the background. The easy option is to shrink and blur the edges of your key until you hide the problem. But, this reduces the edge details you worked so hard to preserve. High end keying software will allow you to adjust the brightness of the edge pixels on your footage. You can lighten or darken them until they smoothly blend in with the background.
Step 3: Adding Tiny Touches
If you have followed the Hollywood Green Screen Process to this point, your footage will look better than 99% of the projects produced by your peers. But 99% better isn’t the Hollywood way. It’s the tiny details that really ‘sell’ the shot.
In the real world there is an interaction between elements in a shot. People cast shadows. Objects in the scene interact with the light hitting the subject. Imagine a person sitting next to the window in a subway car. As the train pulls out of the station it passes by station lights that create a sudden bright flare as they pass and then the train plunges into darkness as it leaves the station.
Bright areas behind a subject tend to wrap around the edges of foreground elements. Hollywood digital artists use light wrap to simulate this effect. There are specific software tools that can add light wrap, and there are also ways to do it manually in many software packages.
In our subway car scene the passing lights in the station are likely to slighting over expose the face of our subject as they pass. Adding color correction effects with masks to restrict them to specific parts of the image can enable you to quickly flash a little extra brightness on the edge of the face as the light passes by.
The process for adding shadows is similar to the bright flashes. You create and animate the shapes of the shadows interacting with object in the background and then overlay them and adjust the transparency levels until it looks right.
Conclusion
The Hollywood Green Screen Process is not a push button affair. You have to put in some effort to achieve the kind of results where people can’t tell the shot was done on a green screen. But, you can get similar results with free and inexpensive tools if you are willing to put in the time.
I currently recommend using DaVinci Resolve for green screen work. The free version of the software has some amazing tools built in. Adobe After Effects is another powerful program that can produce amazing results on a modest budget. And, if you really want to increase the quality of your results, plan to invest in some additional plugins to supplement the tools built into your software.
Got questions about the process (or want to correct something I got wrong?) Leave a comment below and let’s continue the conversation.