How To Setup A Home Office Green Screen Studio
|
|
No matter what your motivation for using green screen in your video production, the entire point of going through the process is to get a good finished result. By the time you reach the bottom of this page you will understand what is needed for success.
The effect is magical, but the process is work!
Shooting good green screen video can be hard. I have a full complement of professional gear to work with and still find it challenging. But, you don’t have to spend a fortune on high-end gear. Your results will be based on several critical factors including:
- The color fidelity of your camera
- The video compression format of your camera
- The color accuracy and saturation of your green screen
- The lighting on your green screen and talent
- The software used to remove the background
- Your personal skill controlling all of the above elements
 The perfect source footage would have one solid even color in the background and absolutely none of that color in the foreground. The transitions between foreground and background would be crisp and clean with perfect focus on your subject. Using good lighting, a good background, a quality camera, and the right camera settings you can get close to this goal and your final results will look convincing and require no heroic efforts in the editing room.
Low end cameras with cheap glass lenses (sometimes even plastic), inexpensive components for capturing the image, and aggressive file compression formats to squeeze the data rates of the video recordings will make it EXTREMELY difficult to get decent results even if you were shooting on a professional green screen stage with thousands of dollars worth of lighting equipment and a professional cinematographer.
Modern digital compositing tools make it possible to salvage a poorly shot video and deliver passable results, but it will take substantially more time and more money to get the work done. And, there will still be compromises in the finished video.
In practice, green screen work is a series of compromises. The best studio spaces, green screens, lights, cameras, computers, and software are all expensive. And, of course, the time available to work on a project is limited too. So, we have to make compromises, and each compromise comes with a price.
The choices you make when setting up your green screen studio will have a huge impact on the results you get at the end. Some professional producers claim that 90% of your success is based on the choices you make when recording in the studio.
This guide is designed to lead you through the choices you need to make when setting up your home office studio to record green screen videos. You will learn when to compromise and when to invest so you always get great results. We will cover the essential equipment needed, how to set everything up properly, and upgrades worth making as your budget grows.
If you run into problems and don’t find the answer in this guide, leave a comment below and I will help you find the solution.
Check out these related articles:
The Ultimate Green Screen Resource Guide
Become a Home Office Video Lighting Instant Expert!
Green Screen Paint – How to Pick the Right One
How to Build a YouTube Channel and Publish Videos That Get Views
6 Easy Ways To Improve The Sound of Your Videos
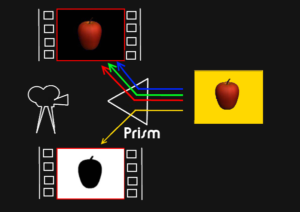
How the Green Screen Process Works
Green screen is the common name used to describe a special effects process formally known as chromakey. This process allows filmmakers to record a subject in front of a solid green background and then replace the background with another image during the editing process. Inside the editing software, the background color is selected and then any color matching that selection is made invisible by the software.
When the right green screen is used (and is evenly lit), and the scene is recorded with a good camera using the correct settings, the process can go very smoothly. When the recording is less than optimal (it is never perfect), the software must work harder to guess which colors are part of the background and which are not. The more variation there is in the color of the background, the less precise the results.
Green screen software tools have become very sophisticated at compensating for poor quality video recordings. But even the best tools struggle with fine hair detail, semi-transparent objects, motion blur, and other challenging images. The better your source footage, the better, faster, and easier your results.
Many video producers stop working once they have keyed out the background. But, professionals go through a few more steps to get amazing results. First, they color correct the image so that the subject and background blend together more effectively. Then, they add something called ‘light wrap’ to give the illusion that some of the light from the background is actually lighting the edges of the foreground subject – much like how light moves in the real world. These finishing touches create the subtle details that trick our brains into accepting the final image as real.
Lights, Screens, and Cameras
Most of your success producing green screen video footage comes from what you do before and during the video shoot. Your lights, your camera, and your screen (and how you use them) have a huge impact on your results. When you know how each one impacts the quality of the footage you record, you will be empowered to make the best choices available at any budget. Spend wisely and you can get great results with modest budgets.
Choosing the Right Screen
 I called this report “Home Office Green Screen†for a reason, and it’s not because you have to use a green screen to remove the background from a video. The process is technically referred to as chroma keying. Chroma refers to color, and the process theoretically works with any color in the background. In the history of filmmaking, other colors have been used. Early black and white films, like F.W. Murnau’s 1927 film“Sunriseâ€, shot against black screens, and “Mary Poppins” used sodium vapor lights to create a yellow tinted background. These choices are often made for very specific technical reasons. But, practically speaking, today you have two options to choose from– blue and green. As a digital video producer, your option is green.
 The reasons why blue and green are the primary colors for chroma key is that neither color is strongly present in human skin tones. Since people are nearly always the subjects being filmed, these two colors make it easiest to isolate the background from the foreground.
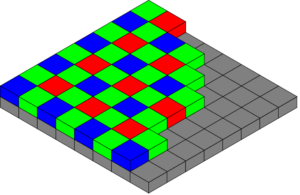
Green is the dominant color for digital video due to the nature of the tools. I won’t digress into a long technical discussion of video image sensors, color spaces, and compression algorithms. It’s enough to know that the green color channel in digital cameras preserves the most color information with the least noise. The result being that green gives you the best keys. If your subject contains the color green, then you would have to use a blue screen. But green is your best option, so choose your wardrobe carefully.
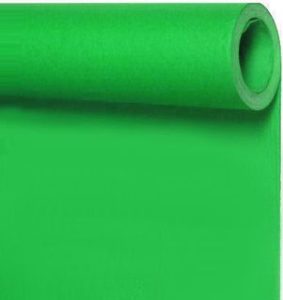
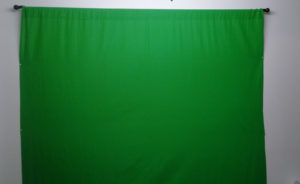
You can create your green background by hanging a cloth backdrop, a paper backdrop, or painting a wall. Regardless of the quality level you choose for your materials, all three options will end up with very similar costs,.
Portability ends up being the deciding factor. If you have a dedicated space for your studio, paint a wall. But, if you need to record in multiple locations, or have to pack away your gear when not in use, then a fabric or paper screen is the better option.
Paper Screens
 Professional photographers use seamless paper backdrops regularly, and chromakey green options are readily available. Paper backdrops are relatively inexpensive. They are very smooth, so you do not encounter problems with wrinkles. They have a matte finish that minimizes reflections, they are portable, and if they ever get dirty or torn, you can cut off the damaged bits and roll out fresh paper.
Chromakey green paper backdrops have their faults. Paper rolls can be heavy and awkward to transport if you are using a wide backdrop. They can tear, crease, and stain with handling. Their disposable nature means you will also have to replace them at some point. So, the ultimate cost of using paper screens can be higher than using a fabric screen.
Fabric Screens
 Fabric screens come in a wide range of options from low budget DIY options to expensive specialty fabrics used by Hollywood. Each option has its strengths and weaknesses, but it is possible to get good results with most of them.
Green bed sheets and plastic sheets are the cheap DIY options for getting a green screen. Self-proclaimed forum gurus will insist that they are just as good as the more expensive options – they are the worst options by far. The color will never be right with either of these options and you will find it hard to isolate the background colors because they contain subtle shades of the colors in your foreground subject. Plastic surfaces will create specular reflections that are impossible to key out. If this is all you can afford, spend lots of time getting the lighting perfect and be prepared to spend a lot of time in the editing room fixing the inevitable problems. What you save in dollars you will pay for with time!
Investing $30-$40 will get you a nice 6’x9’ muslin backdrop with a rod pocket for hanging. This is the material you will find in nearly every low-budget green screen kit you will find online. You can find them in larger sizes and packaged with support stands and lights. Muslin green screens are a big improvement over bed sheets and don’t cost much more. But they also have a few problems. Muslin backdrops tend to be thin, so you have to make sure you don’t have any light coming from behind. Muslin also tends to wrinkle very easily. You can stretch the screen and clamp it to the support stands to smooth out wrinkles. If that is not enough, you can lightly mist the screen with distilled water once it is stretched. As the fabric dries, it will release most of the wrinkles. Another faster option is to use a inexpensive clothing steamer to release the wrinkles once the screen is hung in place. A steamer is a handy tool if you regularly use green screens on location shoots.
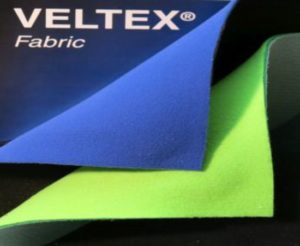 A more expensive fabric option is a thicker non-woven sponge-backed Veltex® fabric. This thick fabric has a fuzzy velvet-like surface that resists wrinkles and reduces hot spots and specular reflections. Veltex® is basically the fuzzy side of a Velcro® fastener. It is a nylon fabric with a polyester foam core and a nylon backing. A 5’x9′ length of untrimmed material can be purchase for about $45 plus shipping ($68 total). This same fabric is used on most of the collapsible framed screens.
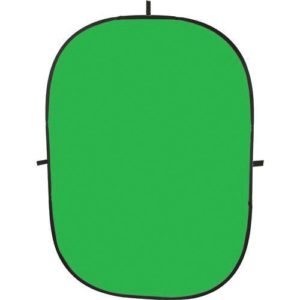 If you don’t need full body shots, flexible framed screens are a good option. These are medium size screens (usually 5ft x 7ft) that have a metal band sewn into the border. The screen folds into a small round disc for storage and transportation. When it is opened, the metal band pulls the screen tight to eliminate wrinkles. There are usually Velcro straps sewn into the trim on all 4 sides to make it easy to attach the screen to stands. The fabric is usually muslin or Veltex and green on one side and blue on the other. The main drawback to this type of screen is the maximum size. Some inexpensive options use a nylon fabric. Avoid them. Nylon is too reflective an will create specular highlights that won’t key out properly.
Big budget Hollywood productions use a Nylon Spandex material that is stretched tight and connected to a support frame. A 9’x12′ digital green colored screen retails for $430. A screen like this is overkill for a home office studio. These screens also tend to be more reflective than Veltex® and Muslin screens which makes it more challenging to control light reflecting from the screen in small spaces.
Painted Screens
Low Budget – The low budget option for paint is latex house paint with a flat finish. It is best to stick with brand name paints, because cheaper paints will have poor coverage and require more coats to give even color. Your cost will be approximately $35(US) per gallon and cover about 250 square feet.
The ideal option for selecting color is to get a small sample of a quality green screen fabric or a color chip from professional grade paint. Then, you can take the sample to your paint store and have it scanned to match the color.
If you do not have access to a reliable color sample, there are several pre-mixed paint colors that have been used successfully by independent video producers. They are:
- Disney Premium Plus Gamma Sector Green (available from Home Depot)
- Behr Premium Plus Sparkling Apple (available at Lowes)
- Sherwin-Williams Neon Green
This video provides a detailed look at the difference between professional paint and the DIY options I just mentioned. If you can afford the few extra dollars, the pro paint makes a measurable difference.
Moderate Budget – Rosco Chroma Key Green is a specially formulated paint that uses pure green pigments to achieve a consistent color that reflects light evenly. This is a professional grade paint used by film and television companies to paint their green screen studio walls. The cost is about $75(US) per gallon and can be purchased through a number of online stores – including Amazon. Coverage is approximately 300 square feet per gallon.
When searching for Rosco paint you will likely come across a number of paints that are labeled as green screen paints which priced somewhere between the Rosco paint and the name brand house paint. Most of these are little more than a house paint formula with a different label.
CCC Digital Green is the paint used by big budget Hollywood productions. The overall performance of the paint is similar to the Rosco paint but the paint is brighter and requires less light. CCC paints are not available through most retail stores. This paint is popular on large stages and movie sets. It is easy to ‘over light’ digital green and end up with a screen that is brighter than your foreground image.
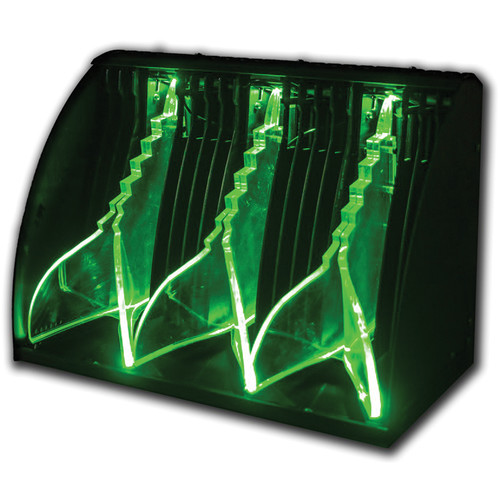
 The 5-Light Green Screen Studio
Before you continue, read the Home Office Video Lighting – An Instant Expert Guide article to gain a solid understanding of the basic lighting concepts required to understand the 5-light green screen studio lighting I’m about to share.
3-point Lighting and a Screen!
 One of the most important concepts in lighting for green screen is that you need to light the screen and subject separately. All of those green screen lighting kits you’ve seen advertised online have given you a false understanding of what is needed to properly light a green screen.
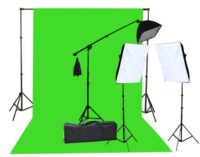
Search for green screen light kits and see what comes up. In nearly every case you will find the same basic equipment: a screen, a backdrop support system, and 2 or 3 lights with stands (and maybe a boom arm.) 3 lights are not sufficient to evenly light a green screen and also the foreground talent. You need at least 2 dedicated large soft light sources for your screen plus 3 lights for your subject.
IMPORTANT: Every time I get into a discussion on a forum helping someone who is having trouble with their green screen process some ‘expert‘ always pops up who says I’m making everything way to complicated and that they only use two lights and everything works great. It is absolutely possible to shoot green screen with 2 lights (I’ve done it.) But, every compromise you make at the beginning has a ripple effect through the whole process. Using the same light on your talent and screen increases the chances of uneven light and shadows on the background. What looks perfect during setup can look very different once your subject starts moving around making shadows. Usually the problems go unnoticed until you sit down to edit – and then it’s too late to fix easily.
Your goal is a screen that is evenly lit with no hot spots or shadows. The overall brightness should be a little lower than the light hitting your subject. If the screen lighting is overly bright, it will wash-out the color and make it less saturated in the recorded video (and significantly harder to key out later.)
Your light kit should have 5 lights in total:
There are lots of options available for lighting. The home office video lighting report goes into details about the specifications you should focus on when selecting your lights, so I won’t cover that in detail here. If you have the budget, I recommend using daylight balanced LED fixtures for everything. They are durable, flexible, light weight, small, and can be powered by battery. The downside is that they cost more up front than your other options. If you are working on a very tight budget, consider using one of the cheap green screen light kits and supplementing it with a couple of DIY bank lights like the ones in this video. Light the screen with the bank lights and the subject with the lights from the kit.
The main goal for lighting your screen is to create even lighting with no hot spots. Bank lights provide a large soft light source with a wide beam spread. Placing one bank light behind the talent on each side of the screen will create a smooth evenly lit screen with minimal light spill onto the foreground subject.
The process of getting the screen lit evenly can be tricky, because hot spots that can cause trouble in the editing room are often hard to see with the unaided eye. There is a really helpful smartphone/tablet app called “Green Screener,” from Hollywood Camera Work, LLC. It can help you quickly perfect your lighting setup.
There is a relatively new option available for lighting your green screen called the FloLight Cyc Light. This funky little light uses green-spike LED lamps (525nm) and some weird looking light-directing fins to throw a color-tuned even light onto your screen. It’s not cheap, but seems like a very cool option for lighting a green screen. Some people like to tint their screen lights with green color gels to intensify the green color.
 Camera Selection and Setup
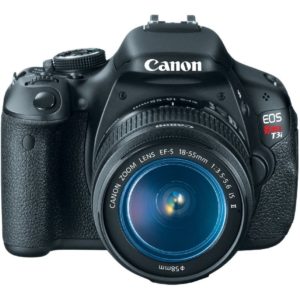
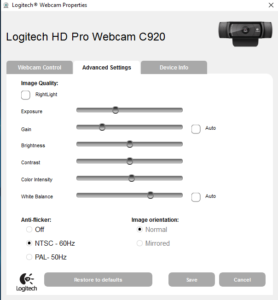
The choice of which camera to buy for your home office green screen studio is a discussion worthy of its own separate report. I have created acceptable green screen recordings with a cell phone camera, a Logitech c920 HD webcam, a second hand Canon Vixia HD camcorder, and a Canon T3i DSLR camera. Better lenses and higher quality image sensors will make a difference – up to a point. In this section, I am going to focus on the settings to use so you get the most out of whichever camera you have.
Camera Settings for Success
The primary goal of your camera settings are to accurately capture the colors in your shot with sharp focus on your subject, maximum resolution, maximum color information, proper exposure, and minimal digital processing. Consistency is also vital. You don’t want the color balance shifting around during the shot, the subject bouncing in and out of focus, or the exposure levels shifting around.
The key to success is manual everything! You don’t want the camera’s automated systems making any choices for you, because they will always be wrong.
Focus, Exposure, and White Balance
 Your camera probably has some very sophisticated automated focus settings.
Turn them off.
While you are at it, turn off the auto exposure and the auto white balance. All of your controls should be set to manual so your camera does not make adjustments as your subject moves around in the frame.
If your camera is shifting the exposure and white balance settings while you record, the color of your green screen will be subtly changing throughout the shot. This makes it harder for your software to lock on to the right color to key out in post production. To compensate, you will have to expand the range of colors to key out which will start reducing the edge details in your shot.
On professional video cameras these settings are immediately accessible from buttons and dials on the body of the camera. With low-end cameras you will have to hunt around on menus and sub-menus to find all the settings. For cell phones, you will have to download an app that gives you manual access to these settings, and a webcam will have likely have special capture app for these controls. Auto settings make your life hell in the editing room – so…
…use the manual controls!
Sharpness/Detail/Edge Enhancement Settings
Next, you need to dig a little deeper into the settings for your camera. All consumer cameras process the images they make before saving them to a file. In an effort to make your images look sharper and better focused, they usually do some kind of edge enhancement to sharpen the contrast at the edges. This creates artifacts that make it harder to create a clean edge in your keys in the editing room. Locate this setting and turn it off or down to its lowest setting. If you need to sharpen your images, you can do it in your editing software after you’ve keyed out the background. A bonus is that your editing software will likely do a better job enhancing edges anyway (and you will gain some control over the process.)
Maximum Bitrate
The bit rate setting controls how much image information the camera saves for each frame of video. On many consumer grade cameras this is called a ‘quality’ setting. The number one way that video compression schemes reduce data rates is by throwing out color information (your eyes are more sensitive to contrast than color.) You want every scrap of data you can get, so set this to the maximum available. As this setting goes up, the amount of space taken up by your videos goes up. You won’t be able to record as many minutes of video as you can with a lower setting. But, that is a price you should happily pay. Buy a bigger SD card or pick up a spare if you need more storage capacity. If you use a lower bit rate, the quality of your green screen footage will suffer horribly.
Maximum Resolution
You should always shoot at the maximum resolution available from your camera. If it records 1080p HD, then use it. If it records 4K ultra HD, use that, even if you plan on delivering 720p HD videos. The process is called oversampling and the extra detail will give you more information to work with when keying with the result being a more detailed and convincing composite image. Scaling down the video at the end of the process makes all of the imperfections smaller and less noticeable.
 Audio Options
It might seem odd to include audio options in a discussion about setting up your green screen studio. Audio does not have any impact on your ability to key out a background. The reason I mention it is that it’s easy to get hyper-focused on the visuals and forget the sound. Bad sound will ruin the best video. I have written a separate report focused on getting the best audio for your videos. I recommend you read it before you shoot.
Planning and Setting Up Your Green Screen Studio Space
When setting up a green screen studio in your home, you often don’t have a lot of options. Typically you find yourself working in a spare room, a basement, or a garage. Doors, windows, and walls aren’t always located in the ideal places. The rooms tend to be smaller than you would like and the ceilings always seem to be too low. This is true of my own home studio.
With a bit of creativity you can turn nearly any space into a great home office video studio.
Permanent or Temporary?
The first big decision you have to make is whether your studio will be a permanent space or a temporary space. If your studio is temporary, you will have to deal with light stands, backdrop supports taking up floor space. You will also need to use a fabric screen of some kind. Your equipment will also need to be a bit more rugged to handle the abuse that comes with repeated setups and breakdowns.
Designating a permanent studio space allows you the option of painting a wall green and mounting your lights to walls or ceilings to eliminate light stands. You also get the benefit of being able to switch on quickly and get to work fast, which will increase your productivity.
You want the maximum separation of subject and background screen. This means you should orient your work space along the widest part of the room. Keeping your subject away from the background makes it easier to light each one separately and reduces the amount of green light reflecting onto your subject.
Sound Control
Sound control is another important element to consider in your studio space. If your room has a lot of echo, try hanging some heavy blankets over any large flat wall spaces (including behind the camera) to reduce the sound bouncing of the walls. Acoustic sound panels work great and there are a number of relatively inexpensive acoustic panel kits available for purchase. You can also build your own if you are more DIY minded and don’t mind a little extra work.
Mounting Your Lights
 No matter which style of lighting equipment you choose for your home office green screen studio, I recommend adding some professional grade mounting plates to your studio. These are essentially metal plates with a mounting stud welded on. They can be mounted to walls or ceilings and provide a sturdy place to attach you light.
  They cost between $10-$15 each. There is also a ‘scissor’ mount that clips onto the channels of a drop ceiling. These are a great option if you are working in a conventional office space. You can mount the lights overhead and run the wires up into the ceiling.
Using these pieces of ‘grip gear’ let you free up floor space in your studio by removing light stands – which take up a huge amount of floor space and are always getting in the way. If you use mounting plates along with battery powered LED lights, you can have a complete professional quality studio with no floor stands or cables.
I personally use a Lowel Big-Foot mounting plate that is designed to attach to a drop ceiling scissor mount. My setup is a bit more expensive, but it gives me options when I shoot projects away from my home studio.
Time To Start Shooting
You now know about as much as you can from ‘book learning’. From here on out, experience is the best teacher. Setup your studio and shoot some test footage. Then, load it into your editing software and start experimenting. If you run into problems, leave a comment and I’ll try to help you work them out and get your green screen project back on track.

Pingback: Hollywood-Style Green Screen Removal – Andrew Seltz: The Go-To Guy!