6 Easy Ways To Improve The Sound of Your Videos
|
|
 We have all watched videos that were ruined by bad audio. Sometimes the volume is so low that you can’t hear what is being said no matter how much you turn up the speakers. Other times electrical buzzing, humming or camera handling noises completely obliterate the rest of the sound. People even ruin an otherwise good recording by mixing in background music that overwhelms the voices.
If the content is good you might strain your hearing for a while and soldier on, but eventually you just can’t take it anymore.
You start to wonder, “is the filmmaker incompetent, lazy, or does he or she just not care?†No matter how you answer the question, you will go away disappointed.
Check out these related articles:
Become a Home Office Video Lighting Instant Expert!
How To Setup a Home Office Green Screen Studio
Green Screen Paint – How to Pick the Right One
How to Build a YouTube Channel and Publish Videos That Get Views
You Are Being Judged
Every time your videos are watched, you are being judged. Consciously, and subconsciously, viewers are making decisions about how competent you are and whether they should trust you. Sound is a critical element of a successful video. Some argue that it is more important than the images themselves.
There are no special effects or magic filters that can fix a badly recorded voice track. But with a little planning and some insider know how, you can create high quality soundtracks for your videos that will have viewers focused on the content instead of distracted by the flaws. In this report you will learn the essential secrets for creating successful audio tracks for your online videos.
Imagine how your videos will stand out from the crowd when you have crystal clear audio that doesn’t send people diving for the volume controls or straining to make out what you are saying. Viewers will be moved by the music you place in the soundtrack, but still clearly understand every word being spoken. They will be focused on your message…
…just where you want them to be!
The Big Picture
There are two critical stages in the video creation process where you need to make decisions that will have a big impact on the quality of your finished audio. The first is when you are recording the video and the other occurs during the editing process.
The recording process is the most critical step because there is little that can be done later to significantly improve a badly recorded soundtrack. The majority of the secrets you are about to learn are focused on recording clean, clear, strong audio from the start. The fewer mistakes you have to fix, the better your finished audio will be (and you will spend less time editing.)
A good audio recording can be improved (or ‘sweetened’ as sound professionals call it) during the editing process. There are many ways to tweak a soundtrack, but in this report we will focus in on the two things you will do most frequently – adding music and adjusting volume. Get that right, and the rest is a bonus.
Now that you have the big picture, let’s get into the specifics.
1. Start Clean: 3 Critical Questions
The number one thing that you can do to end up with great audio in your web videos is to record good clean audio in the beginning. The most common reason people record bad audio is that they don’t actually think about the audio at all while shooting their video. The first time they notice something wrong is when they sit down to edit and realize that the audio is horrible. Then they start a desperate search for ‘tricks’ to fix it. There are no magic tricks!
Shooting videos with bad audio increases the chances that you will either: create an amateurish video loaded with audio flaws or never finish the project at all. Projects get into trouble because the sheer number of problems that need to be fixed overwhelms your available time and talent. And, some problems just can’t be fixed.
The most efficient and effective way to get great audio is to spend a little time planning for it before you press record. Even if you are simply shooting a quick video with your phone, a short pause to plan will make a huge difference in your results.
Here are some audio questions to ask yourself before hitting the red button:
- Is this the quietest location available?
- What mechanical devices can be moved or turned off?
- Can noise sources be seen in the shot?
Is this the quietest location available?
Noisy locations make it hard to record good audio. The worst noises are sounds that have the same pitch as the human voice. So rooms filled with people talking (like convention centers, conference rooms, and gymnasiums) are difficult locations to work in.
If the location isn’t critical to the shot, find a quieter place to work. A carpeted hallway can work, or a small side room. Stepping outside is often an option too.
If you need to see a noisy location in the background of your video (like a busy convention floor), try stepping into a quieter area between booths or shoot from a hallway through open doors. Many times you can find a room with a window looking out onto the busy space where you can get better audio while still seeing the action. If you need more crowd noise later, you can always add it in.
What mechanical devices can be moved or turned off?
Modern homes and offices are filled with buzzing, humming, whirring technology. Before you shoot, look for anything noisy that can be moved or turned off.
Anything with a fan should be moved or turned off. This includes computers, space heaters, window air conditioners, etc.
If you need to have a computer display in the picture, get an extension cable for the monitor and move the computer (with its noisy fan) further from the microphone. A wireless keyboard and mouse will let you control the computer without more wire extensions.
Central heating and cooling systems can also be significant noise sources. Plus, they have a nasty habit of cycling on and off right in the middle of something important – and that is also when they are loudest. Shut them off while recording, if you can.
Don’t forget to silence phone ringers and alert tones – cell phones and landlines.
Can noise sources be seen in the shot?
If you are forced to shoot in a noisy environment, make sure that you visually acknowledge the source of the sound. If you are shooting in a noisy gymnasium, but the viewer has no visual cues to explain the source of the background noise, the sound will distract them from your message.
If you choose a shooting position where the noise source isn’t visible, make sure to get some extra footage of the source to use in the editing process to establish the location and the sound source.
2. Hide the Problems
Not all sounds can be eliminated from your recording environment. So, the next best thing is to cover them up.
A little later in this guide we will discuss something called the 2K Scoop. In that section I mention that there is a specific range of frequencies where the important parts of human speech occur. The sounds in these frequencies are responsible for the clarity needed to clearly hear what is being said. Suppressing sounds in this frequency range can help improve the clarity of your recordings.
Luckily the sounds we want to control are the easiest to block. These are higher frequency sounds. If we block these sounds from the recording, any other noise will be easier to adjust without interfering with the vocal clarity.
Heavy blankets, coats, or even a person or two placed between the microphone and a noise source will absorb some of the high frequency noise. Professional crews carry sound blankets to help control echoes and noise. These are similar to regular moving blankets with the exception of being black in color so they don’t reflect light into the shot. You can purchase them for $30-$40 each if you want a sturdy professional looking product, but a heavy blanket or quilt works very well too.
Take care not to block the ventilation for electronics. You can easily cause them to overheat and damage the equipment. Instead, hang the blankets between the noisy equipment and the microphone. Blankets draped over a couple chairs works well or you can have an assistant or two hold them up while you are recording.
If you can’t cover up the offending noise source with blankets, then turn your back on it – literally! The human body is very effective at absorbing sound. So, you can use the camera operator to block noise for camera mounted microphones and the subject’s body can do the same when using lapel microphones. The microphone will be separated from the noise by a body which will deemphasize it in the recording
Last, but not least, use wind covers on microphones whenever you are outside. Wind blowing across a microphone creates a loud low frequency rumble. If this rumble makes it to the recording, it can overpower the other sounds.
A simple foam wind cover will greatly reduce this noise. Some higher-end microphones also include a rumble filter (sometimes called a low frequency cut-off) which basically mutes frequencies below the range of the human voice to eliminate the rumble before it gets to the camera.
3. There Is NO Audio Zoom Control
Microphones need to be close to the sound source. To make a distant sound appear closer, the camera increases the volume to make the sound louder but this also affects the noises coming from sources closer to the microphone. Unlike the way a zoom lens crops away the image outside the frame, all of the sound still makes it into the microphone. To make matters worse, the sounds closest to the microphone will be most prominent in the recording.
The solution is to get your microphone as close to the source as possible. If you are using the on-camera microphone this means getting as close to your subject as possible. But, the best solution is to use an external microphone.
Several options are available for external microphones. The fancy (and expensive) approach is to get a wireless microphone system with a lapel mike (also called a ‘lavaliere’) or one of those fancy headsets worn by stage actors and professional speakers. Another approach is to use a wired microphone. The headset and lapel microphones are available in wired varieties. A third approach is to use a shotgun style microphone.
Wireless systems are very flexible, but you need to stay away from cheap gear. Low quality transmitters and receivers will introduce static and audio drop-outs to your recordings. They are also more prone to interference from other sources. Expect to invest several hundred dollars for the basic equipment and more for low-profile headsets.
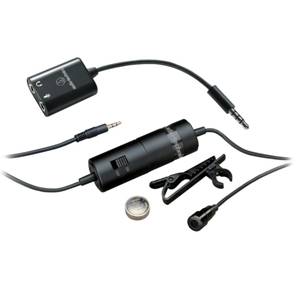 Wired lapel microphones are one of the best options available for reliable high-quality voice recordings. The equipment is relatively inexpensive. Audio-Technica makes a wired lapel microphone that plugs directly into the 1/8†mini-plug jack found on DSLR and prosumer grade cameras. It comes with a 20 foot long cable, lapel clip, battery, and costs less than $25.
NOTE: Lapel microphones and headsets require a power supply to work. When shopping for a microphone, make sure you get one designed to plug directly into your camera (they usually have a battery holder near the plug end of the wire.) Check the resource list at the end of this report for specific gear recommendations.
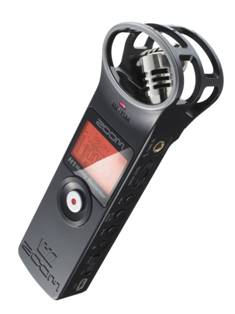 If the idea of being tethered to a camera by a thin wire doesn’t sit well with you, you can borrow a trick used by wedding videographers. They connect the wired microphone to a portable digital recorder like the Zoom H1 Digital Recorder and record the audio separately from the camera. The audio is synchronized to the video during editing. Since the recorder is very small, it can be tucked into a pocket and, unlike wireless systems, it is not susceptible to interference (and it’s much cheaper too!) You also avoid trying to rig up adapters if you are shooting with a cellphone camera or DSLR. I recently purchased an H1 for my production kit and am very happy with the recording quality and convenience.
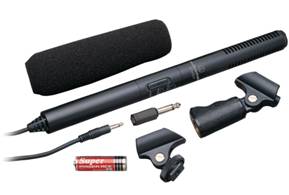 Another option is a shotgun microphone, which is a long thin microphone that emphasizes the sounds coming from directly in front. People often get the mistaken idea that they work like a zoom lens for sound, but that is not true. Shotgun microphones do not make distant sounds appear closer; instead they minimize the volume of noises coming from the sides. You still need to get as close as possible to your sound source.
A shotgun microphone is often mounted on top of the camera or fixed to a pistol grip or boom arm and held by a sound person. Regardless of how they are mounted, you must make sure they are pointed directly at the sound source for best results. If the person being recorded is even a little off-axis, the volume of their voice can be dramatically altered.
Shotgun microphones are available with 1/8†mini plugs that can plug into consumer grade cameras, digital audio recorders, smart phones, and tablets.
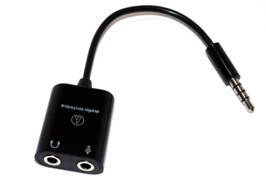 Most smart phones will allow you to plug in an external microphone, but you will probably need a microphone input adapter (even if the plug fits into the jack.) The built in jack on a phone is designed to carry both headphone audio and microphone audio at the same time, so the connections inside are a little different than the microphone jack on a dedicated video camera.
If you use an iPhone or iPad you have the option of adding a dock-based audio adapter. These have their own high quality analog-to-digital converters built in and will generally provide higher quality sound than plugging directly into the device with a simple plug adapter.
4. Your Camera Is Stupid
Video cameras are marvels of modern technology. But, in many cases they are just plain dumb. One of those cases is a feature called Automatic Gain Control (AGC). This is the camera’s attempt to guess how loud to set the microphone volume.
If at all possible, turn this feature off!
Automatic Gain Control will attempt to maintain a strong and consistent volume level in your recordings. If it detects silence, it cranks up the volume. When it detects a loud noise, it quickly drops the volume. What you mostly get is a soundtrack filled with over-amplified background noise and sudden volume drops whenever someone begins to speak.
Check your camera manual for instructions about disabling Automatic Gain Control and setting the microphone input levels manually. The manufacturer might call them automatic volume controls or something similar.
Before recording, setup your external microphone and test the volume by having your subject speak briefly at the same volume he or she will use when recording. If your camera has audio meters, adjust them to the highest setting possible WITHOUT the loud sounds peaking (this is when the signal hits the highest point.) If you don’t have audio meters, record a short test video and play it back and make adjustments. Repeat the process until you get the loudest sound possible without distortion.
5. Get Normal
Consistency is a big challenge in audio recording. From one shot to the next your audio levels can shift – even if you never move the microphone or change the settings in your camera. Sometimes your subject’s energy level goes up, and so does the volume of his or her voice. If they shift position and their voice aims a little more toward the microphone, the volume changes again. Getting it all evened-out is easy using the normalization tools in your editing program.
Normalization tools scan through an audio recording and detect the volume peaks. Then, they adjust the volume of the recording up or down until the loudest sounds conform to a level you preset. Quieter recordings get boosted and louder ones get toned-down.
After normalizing, your recording volumes will be much more consistent from one to the next.
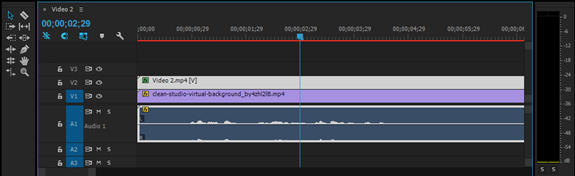
The normalization effect can be accomplished inside the timeline in most video editing software. My preferred editing software is Adobe Premiere. Here is a quick walk-through of how normalization works in this software. In this first image, notice the low volume of the audio track.
Selecting the audio track and then moving the cursor over the track and right-clicking with the mouse brings up a contextual menu that contains an option labeled ‘Audio Gain.’
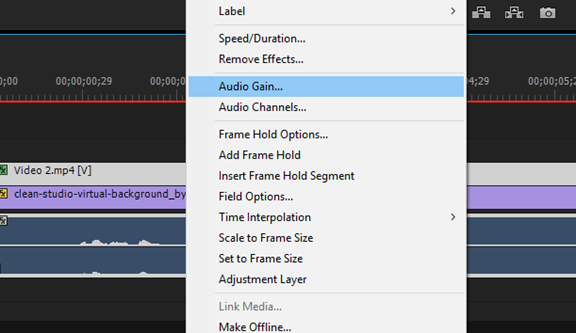
The audio gain tool has a number of options available. The one we want is labeled ‘Normalize All Peaks To.’ This option allows you to select multiple audio clips and set a target volume level. It then scans the audio of each clip and adjusts the volume so that the peaks are at your target. The peak volume of each clip is considered separately.
Volume is expressed in decibels (dB). The decibel scale is a little counterintuitive. The maximum volume is 0 and then the numbers go lower as the volume gets quieter. The volume unit meters (VU) in the Premiere software go from 0 down to -60dB. Most professionals like to leave a little ‘headroom’ in their audio so that there is room to raise a track’s volume later in the audio mixing process without maxing out the volume. I recommend using the setting “-3dB’ as your normalization target.
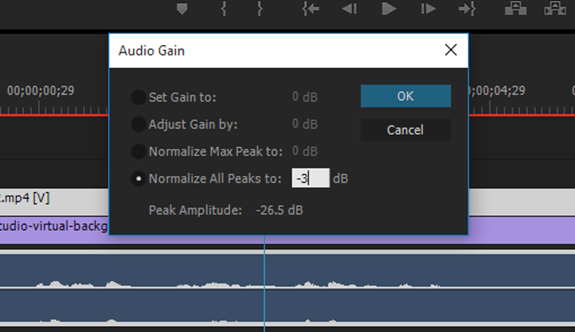
Once you click okay and the software processes each clip, you will see the visualization of the audio change as each track’s volume is adjusted to match the new target peak volume.

If you record separate audio in the right and left channels (like from a shotgun and lapel microphone) you may need to split the tracks and normalize each one independently to get consistent levels for each channel.
6. The 2k Scoop for Better Background Music
Music is a power tool in the video creation process. Songs can add energy to a video and evoke emotions. But one thing that often happens to inexperienced sound editors is that the music ends up ‘muddying’ the soundtrack.
The process usually goes something like this. You add the music to your video and play the video to check out the results. With the music playing you can’t hear the dialog clearly so you lower the volume on the music and play it again.
Playing the video with the music volume lower doesn’t fix the problem so you lower the music volume again.
The process repeats until the music is so quiet you can barely hear it. You start to wonder how the pros can create a soundtrack where the voices are clear and the music is loud too.
Here is the secret. You have to ‘make room, for the voices’ in the music recording. You do this by adding an EQ (equalizer) filter to the music track.
The sounds of human speech (specially the parts relevant to clarity) occur in a specific range of sound frequencies. This frequency range is roughly centered at 2kHz. When you mix music with voice recordings, the parts of the music in this same frequency range compete with the vocals and result is confusion. To fix this, we will reduce the music volume in that specific frequency range so it doesn’t compete with the voices. The overall music volume can remain higher without compromising the vocal clarity.
If you aren’t familiar with equalizers, think of them as detailed volume controls. Instead of raising and lowering the volume of the entire recording you can focus on specific sound frequencies. The controls will either be a graph, a series of dials/sliders, or a combination of both. Here is a screenshot from the EQ filter controls in Adobe Premiere that uses both a graph and dials. I’ve set the Mid2 controls to lower the volume 12db at the 2kHz frequency and tapered the effect to create what looks like a small trough in the graph line. The dial labeled ‘Q’ controls how widely the adjustment spreads to nearby frequencies. The frequencies you quiet are where the voices will fit when you mix the tracks together.
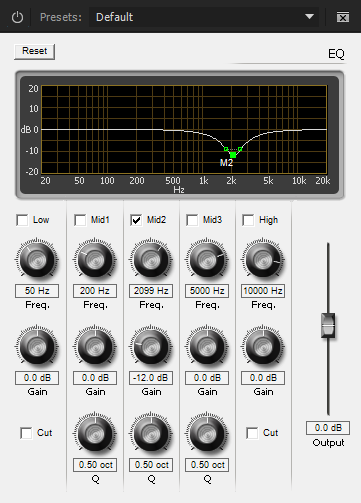
Once the EQ filter is set on your music track, play back the music and voices together and adjust the overall volume of the music track. You will find that the music volume can be much higher without interfering with the vocal clarity.
You will need to fine tune the EQ settings, but this is a good starting place. If the music is going to be very soft in the background you can be less aggressive with the EQ settings.
If your music will play through the whole video and you have titles at the beginning and end, you can fade in and fade out the EQ adjustments so that the music is dominant at the beginning and end, but more subtle while people are talking.
If you need to make the voices ‘pop’ more on an otherwise well recorded track you can reverse this process and apply an EQ filter that boosts the frequencies in the 2kHz range.
Audio Checklist
Here is a quick checklist to run through before you shoot and publish your next video.
- Chose the quietest location available
- Silence or move mechanical devices and phones
- Record establishing shots for all unavoidable noises
- Cover up all noise sources that cannot be moved
- Place microphone as close to talent as possible
- Turn off automatic gain controls
- Set manual audio levels
- Normalize all audio to the same level
- Use 2k Scoop for music tracks
Resources
Below are links to a few resources mentioned in this report. These resources are relatively inexpensive and can make a huge impact on your audio. If you had to get only one thing, I would recommend the Lavalier microphone (I have one that I use frequently.)
Audio-Technica ATR3350IS Omni Lavalier Microphone
Audio-Technica ATR-6550 Shotgun Microphone
Adobe Premiere (Creative Cloud Suite)
Zoom H1 Digital Voice Recorder

Andrew thanks for the 2k scoop tip that is very useful!
Pingback: Hollywood-Style Green Screen Removal – Andrew Seltz: The Go-To Guy!