Audio Compression Secrets for Information Products
 Customers love audio products. Whether they are recordings of seminars and teleconferences, one-on-one interviews, or audio versions of print materials, a well produced audio product is a high value item. For you as a product creator, this is great news.
However, recorded audio products do come with a downside.
The Problem With Audio Products
Unlike your typical e-book, a high-quality audio recording can consume hundreds of megabytes of storage space. Try to deliver a massive audio file to your end user and you will quickly find yourself burning through your bandwidth delivering the product. You can easily end up losing money to excess bandwidth charges or find that you have to price your product higher to cover the additional costs. In the worst case, you lose customers and get a bad reputation because people cannot access the products they purchased.
The solution to this problem is to compress your audio files until they are small enough to deliver cost effectively. However, if you are not a trained audio engineer, you can easily end up with awful results that make you appear like an amateur.
The answer is right here. In this multi-page article I will lead you through the steps of preparing and compression audio files and show you how to create top quality results that are small enough to deliver cost effectively. Nothing is left out and there are plenty of illustrations to guide you through the important steps.
Why I Wrote this Article In The First Place
 A while ago, Dennis Becker purchased the rights to distribute an excellent collection of audio recordings called “ListFX” to give to the members of his Earn $1K A Day Forum (I’ve been a member there for years and this is one of the perks of membership). I love listening to audio courses and rushed over to the download section of the site as soon as I saw the listing. But, there was a BIG PROBLEM with this product…
…there were NO AUDIO FILES to be found???
When I got to the download area, all I found were the transcripts of the recordings -no audio files. I sent a message to Dennis asking when I could get the audios and he replied that he was trying to decide how best to distribute them because the audio files were OVER 450 MEGABYTES and, if several of the members started downloading them at the same time, the performance of his server would suffer.
I have a few skills in the audio editing department – and I wanted those recordings. So, I asked if I could take a try at re-compressing the files to bring them down to a more manageable size.
My results:
450 Megabytes reduced to 80 megabytes and the audio still sounds excellent!
Keep reading and learn the step-by-step details of the process I used to achieve those results.
The Software You Need To Follow Along – It’s Free!
 The software involved is a very capable audio editing package called Audacity which is available for free download. Make sure you have downloaded Audacity 1.3.3 Beta. Several of the essential functions I used are only available in the new Beta version.
You will also need to download the latest MP3 Encoder and save it in the plugins folder in your Audacity installation. The first time you try to make an MP3, Audacity will ask you where this file is located.
If you have any questions about installing this software, there are excellent instructions on the Audacity website.
The specific tools I use in this process are common in most professional audio editing software. So, if you are using a different audio package like Adobe Soundbooth or Sony Sound Forge Studio, you should be able to adapt the instructions without much difficulty.
A Little Compression Theory
 The core concept behind audio compression is to throw away stuff that no one will notice and then squeeze the daylights out of whatever is left. The sound file you have after going through the compression process is not the same as the one you started with. All of the unnecessary information has been thrown out. So, always keep a copy of your original.
There is more going on inside the software, but that is enough information to help you make some wise choices during the compression process I’m about to explain.
48kHz 16 bit Stereo
The heading above may look like Greek to you, but it describes the key information you need to know about any audio file. When dealing with audio files you are likely to run across settings that look like this:
48kHz 16 bit Stereo
I will give you specific settings to copy in the examples, but it is important to know what those numbers mean.
The 48kHz number refers to the sample rate for the file. This is the number of times per second that the computer checks (or samples) the sound signal and records the information. This is measured in kilohertz (kHz).
Professional recording equipment often records at 48kHz (48,000 samples per second) and CD Audio is recorded at 44khz (44,000 samples per second.)
The 16 bit number refers to how much detail is captured and stored during every sample that the computer makes. Most professional equipment, including CD Audio, records 16 bits of information for every sample taken.
The final item, Stereo, is probably obvious. This indicates whether the audio has a left and right channel (stereo) or just one channel (mono.)
More samples per second and more bit depth equals a more accurate recording. Stereo is beneficial if you have 2 separate input sources, but a waste of bits if you don’t. In reality, most people don’t have the ability to detect the difference in sound quality above 44kHz 16 bit. And, lucky for us, sound quality settings for a recording of speech can be reduced drastically before anyone will notice (the phone company compresses phone calls like crazy and nobody complains – mostly!)
If you are making your own recordings, record and save the master files at either 48kHz or 44kHz and 16 bits. If you have two separate inputs record stereo. If you have one, mono is fine. By recording and preserving at the highest quality available, you will have the most flexibility in the future if you need to edit or modify your sound files.
At 48kHz 16 bit Stereo a sound file uses 188 Kilobytes for every second of sound recorded. That works out to 11 megabytes per minute which is obviously too large to deliver to customers online. So, you need to compress the audio as much as possible before sending it to your customers.
My Compression Process for the ListFX Files
When I first received the ListFX files from Dennis Becker, the total size of the collection was 450 megabytes with individual file sizes ranging from 35 megabytes to 68 megabytes. They were recorded in MP3 format which does provide some compression, but much more was needed.
Here is what I did:
- Step One – Examine The File
- Step Two – Converting Stereo To Mono
- Step Three – Normalize The Audio Levels
- Step Four – Filter Out The Noise Using Equalization
- Step Five – Reduce The Bit Depth And Sample Rate
- Step Six – Save To MP3 Format
- Step Seven – Listen To The Compressed Files
Now, let’s break down the steps in detail. I will be showing you precise details of each step, so don’t worry if that process seems a little intimidating at first glance.
Step One – Examine The File
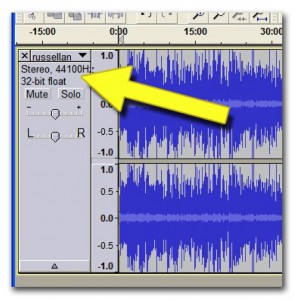 The first step was to open a file and see what the sample rate and bit depth were and whether the file was mono or stereo. To the left of the audio waveforms in the Audacity project window is a clip information box that contains the sample rate, bit depth and mono/stereo information for the sound clip. The clip in the screen shot above is 44kHz 32 bit Stereo file. You will also notice that the waveform window has 2 audio tracks.
The files were not all exactly the same settings, but most were 44khz 32 bit Stereo files. This was good news because it meant I had high quality copies to work with and there was plenty of opportunity to reduce the file sizes while preserving the sound quality.
Step Two – Converting Stereo To Mono
A quick look at the audio samples revealed that the left and right channels for the stereo file were identical. This means that 1/2 of the information in the file is redundant. So, the first step was to convert the file from stereo to mono.
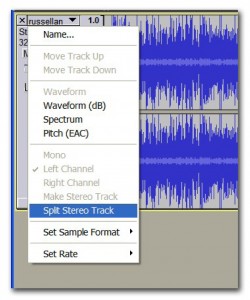
Clicking on the drop-down menu on the clip information window brings up the option to ‘Split Stereo Track.’ Selecting this turns the stereo clip into two separate clips. One labeled left and one labeled right.
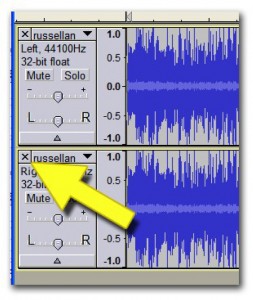
Click on the X on the lower clip and close it. This leaves one track labeled left containing the audio from the left track of the original stereo file.
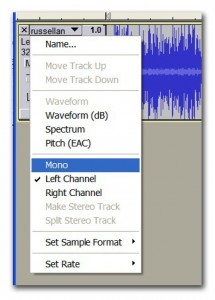
Going back to the drop-down menu in the clip information box, select ‘Mono.’ Now the clip is a mono file.
This step immediately reduced the file size by 50% with no change in the quality of the audio. Nearly every MP3 player in existence, when given a mono file, plays the sound back in both the left and right channel which gives the same effect as having the stereo version.
Cleaning Up The Audio Files
Before making any changes to the sample rate or bit rate, I cleaned up the audio to remove as much stray noise as possible. When applying heavy compression to an audio file, stray noises (even ones you don’t notice) can get distorted and turn into hissing or other objectionable sounds. By filtering out anything that isn’t essential to the primary sound on the clip (in this case, speech) we maximize the clarity of the final audio clip. In many cases this will allow you to compress the file more heavily while still maintaining clarity.
It is important to do this filtering before reducing the sample rate and bit rate because the precision of these tools goes down as the sample rate and bit depth go down. For this reason, down-conversion and MP3 compression are the very last steps in the process.
Step Three – Normalize The Audio Levels
My first cleanup job is to check the overall volume of the audio. Many times a file exhibits ‘clipping’ where the audio is so loud that it exceeds the maximum volume (which causes distortion and also makes the clip overly loud when playing back.) Other times the volume may be a little too low.
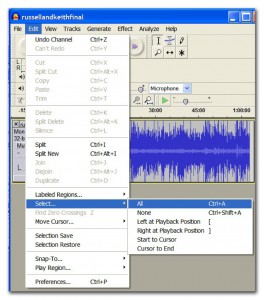
We begin the process by selecting the entire audio clip using the function in the edit menu.
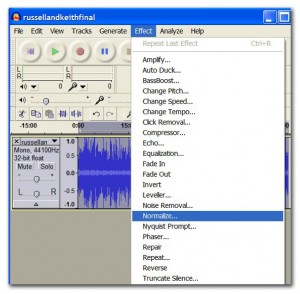
Next, using a tool called the ‘Normalize’ tool, I set the maximum volume of the clip to -.1 dB (decibels.)
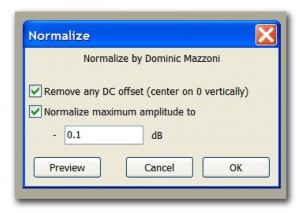
This tool will go through the entire audio file and look for the loudest sounds. Then it will either reduce or raise the overall volume of the whole file until the loudest noise is -.1 dB.
When you are working with multiple files which were recorded at different times by different people (like I was with the ListFX files) this step helps to keep the volume more consistent from clip to clip.
Step Four – Filter Out The Noise Using Equalization
Next I apply a graphical EQ filter. This filter works just like the EQ settings on your stereo system. It will allow you to raise or lower the volume of the clip at different frequency ranges.
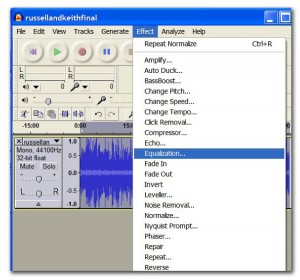
Most of the stray noises in a voice recording are at the very low and very high frequencies. The sounds that create speech exist mostly in the 1k-2k frequency ranges. By dropping the volume in the frequencies above and below this 1k-2k range, we can eliminate the noise and preserve the vocal clarity.
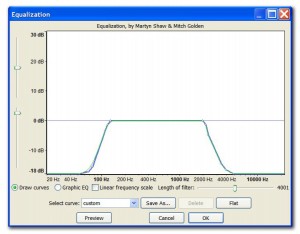
The Equalizer tool in Audacity allows you to draw a line that shows the frequencies were the volume should be raised or lowered. When the line is at 0 dB the volume is unchanged. Below that the volume is lowered and above that level the volume is raised. We want to drop the volume at both ends of the frequency range to -18 dB and slowly taper the transitions. The image above shows the settings I used for the ListFX files.
It is easy to overdo this and end up with a very tinny sound, so I tend to only silence the highest and lowest frequencies and then gradually fade out the frequencies in between. Try out settings and listen to their effect. Filter out as much as possible until the audio starts sounding tinny and then back off a little.
Optional Cleanup
Some audio packages have additional tools for restoring ‘clipped’ files and repairing other damage, but the steps listed above are sufficient for creating a high quality recording – particularly if the original recording was clean and clear and recorded at the proper volume.
Step Five – Reduce The Bit Depth And Sample Rate
The final step is to reduce the sample rate and bit depth of the clip to 22.05khz 16 bit.
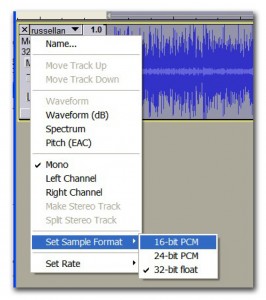
On the drop down menu in the clip information box, select ‘Set Sample Rate’ and change it to ’16-bit PCM.’ It will take a minute or two for Audacity to re-calculate the bit depth for every sample in the file. It may seem like the program has frozen (there isn’t any sort of progress bar to indicate that the program is working.) But, when it is done, the screen will refresh and the clip information box will display ’16-bit.’
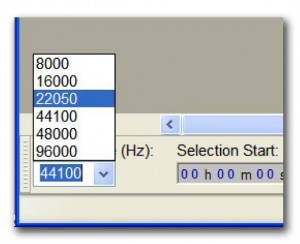
Audacity automatically re-samples any clip in a project that does not match the project’s sample rate. So, to change the sample rate of the files we’ll be exporting, all we need to do is change the project sample rate in the lower left corner of the program window. Now, everything we export from this project will be saved as 22kHz 16 bit Mono.
Step Six – Save To MP3 Format
Now it is time to compress the file into an MP3 file at a data rate of 24Kbps (24 kilobits per second) and save to disk.
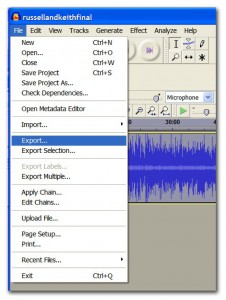
Select Export from the file menu.
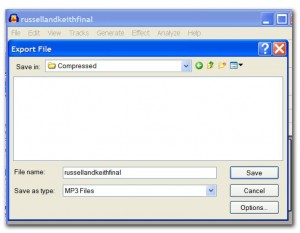
Choose MP3 as the File Type and click the Options button in the lower right corner.
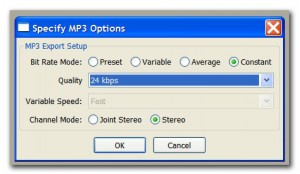
In the options window select Constant for the Bit Rate Mode, 24 kBps for the Quality Setting and Stereo for the Channel Mode and save the audio to a new file.
Step Seven – Listen To The Compressed File
 This final step is often neglected because it is time consuming. But, it is important to open up each audio file you compress and listen to the final version to make sure that everything still sounds good. Every now and then some stray noise can pop up during compression and you may need to go back and tweak some of your settings to isolate it and remove the noise.
If your file sounds good, you are read for distribution!
Do you need a shopping cart solution that is inexpensive, reliable, and totally automates the order processing and file delivery of your audio product? Then, check out the Shopping Cart Solution I Use.
Wrapping It All Up…
 You can also play with the file settings and reduce the file size even more – you just need to gage how much compression noise you are willing to accept in your finished file. If it’s a free giveaway product you might want to compress a little more and save bandwidth delivering the content. If it’s part of a $97 product, you might want the sound to be a little richer and clearer (and deal with larger files!)
After these steps the final size for the ListFX audios was reduced from 450 megabytes down to 80 megabytes – an 82% reduction in size and the sound quality is still excellent.
Here are the steps again:
- Open the file and examine the sample rate, bit depth and stereo settings
- If stereo and channels are identical, convert to mono
- Normalize file to -.1dB (decibels)
- Filter audio using graphic EQ to silence high and low frequencies
- Reduce sample rate to 22.05khz and bit depth to 16 bit
- Compress and save to MP3 format at 24Kbps data rate
- Listen to final audio to verify quality