Shooting a Green Screen Test
|
|
 Read more articles about lighting and video/film production at my Indie Film Blog.
This is not the right way to shoot a green screen, but I needed to work in a hurry.
I found an opportunity to convince some business folks on the benefits of an in-house studio space with a built-in pre-lit green screen. I wanted to make sure the execs knew that we already had the technical capacity to shoot and composite green screen work and that we only needed dedicated space to make an efficient system.
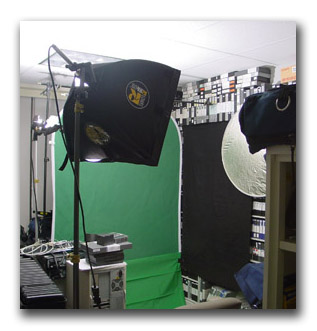
The first photo shows my basic screen setup inside the office used for my editing/equipment storage room. The main screen is a Photoflex Flexdrop collapsible blue/green screen. Since I needed to grab a full body shot, I clipped on the vinyl green screen that shipped with my copy of Serious Magic Visual Communicator Studio.
The first big problem with this whole setup is that there is not enough room to evenly light the screen and talent. All of the lights would have to be placed too close.
The second problem (which you can’t see) is that I had to place the camera in the hallway to properly frame the wide shots. While I set everything up, people kept asking permission to pass (and later wandered in front of the camera whenever I tried to shoot. )
The set-up was not ideal, but it was my best solution for this quick test shoot. I planned to use Serious Magic Ultra 2 to do the compositing, so I figured this would test the software’s capacity for pulling keys from sub-par setups.
 The second image shows the lighting setup. I used a Lowel Rifa Light for my foreground key light and a silver reflector to bounce fill light from the opposite side.
The screen is lit by a Lowel Tota light shining through some tough spun diffusion material. Spill from this light was controlled by clipping some blackwrap to the light to flag it off from the rest of the room.
 Hidden from view is a Litepanel LED light that I hung overhead to create a backlight. This is a great little light that you can stick just about anywhere. It dims without color shift and works on battery. I hang it from a boom arm when I want to drop a little light in without having to run cables. As a bonus, it also runs cool.
I recorded the footage with a Sony Z1U HDV camcorder in 1080i mode. The footage was transferred to my Adobe Premiere Pro 2.0 edit suite and saved to disk. The HDV footage was loaded into Ultra 2 for compositing.
Ultra 2 is a pretty cool little software package. It comes with virtual sets and background stills that you can drop behind your subjects.
Ultra 2 uses technology called vector keying to extract the subject from the background. You shoot a bit of footage of the screen without the talent, and then use that to let the program define the key. The program is looking for differences between the background and the image with the subject. It is sort of like screen correction in the Ultimatte process. This is supposed to compensate for unevenly lit screens and allow the software to still create a great key. The big limitation is you cannot move the camera. Ultra compensates for this by creating virtual camera movements to liven things up.
I found the key definition process in Ultra to be counter intuitive. I have some experience pulling keys in After Effects and missed the ability to view the matte and fine tune my settings. One of my full body shots just wasn’t working in Ultra. I used the Keylight plugin in After Effects to quickly create a key and then comped it over a pure green background. I output the results as an uncompressed file and reloaded it into Ultra to insert in a virtual set.
I was surprised that this clip, with the smoothest and most even green background, was hardest to key in Ultra. I don’t know why it was so much trouble. I had to use a lot of matte choking to get it to work. Ultra shrunk the clip down to fit in the virtual set, so you do not notice much.
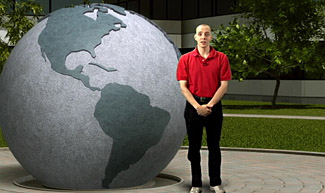
For head and shoulder shots, this type of setup works fine. For full body you really need more room to seperate the talent from the screen and to get the lights further away too. You can see my results below. It is not bad – not perfect either.
Ultra isn’t quite the instant virtual set dream I had hoped for. It does a fine job, but I think I’ll be more happy pulling most of my comps together in After Effects. The virtual sets look very computer generated. There is also no way to bring in your own 3D scenes.
Do you have questions about green screens and virtual sets that I didn’t answer? Drop me a note with your question and I’ll get you an answer.
The Go-To Guy


DO YOU BY ANY CHANCE KNOW WHAT KIND OF GREENSCREEN SOFTWARE ICARLY USES? IF NOT, DO YOU RECOMMEND ANY SOFTWARE TO USE WITH MPEG VIDEO FORMATS?
Victor,
I don’t know what they use, but it is probably one of the Ultimatte packages.
MPEG is a heavily compressed format and one of the first things to go is color information. so, you might have a hard time pulling keys. A lot depends on how your MPEG is encoded.
In any case, there are two software keyers that I am comfortable recommending. The first is the Primatte Keyer distributed by Red Giant Software and the other is DVMatte Pro distributed by DV Garage. Both are specially designed to work with compressed footage and can overcome some of the limitations.
Both of these keyers work as plugins to your editing software. DVMatte Pro works with Final Cut Pro and Primatte works with Mac and PC editing suites.
No software can overcome badly lit and shot footage so take great care with your setups to minimize the issues you have to deal with in post.
I hope that helps,
The Go-to Guy!
Not bad for a quick set up.
Surprise wih the two tone green that it keyed out nicely
Chris,
It wasn’t ideal, but it worked. I had to spend a little time playing with the key to get a clean extraction, but it helped to be working in HD and shrinking everything down to SD for the composite (which also reduced the image further to place it in the frame.) Scaling down covers up a lot of rough edges.
Andrew