Planning and Setting Up Your Green Screen Studio Space
When setting up a green screen studio in your home, you often don’t have a lot of options. Typically you find yourself working in a spare room, a basement, or a garage. Doors, windows, and walls aren’t always located in the ideal places. The rooms tend to be smaller than you would like and the ceilings always seem to be too low. This is true of my own home studio.
With a bit of creativity you can turn nearly any space into a great home office video studio.
Permanent or Temporary?
The first big decision you have to make is whether your studio will be a permanent space or a temporary space. If your studio is temporary, you will have to deal with light stands, backdrop supports taking up floor space. You will also need to use a fabric screen of some kind. Your equipment will also need to be a bit more rugged to handle the abuse that comes with repeated setups and breakdowns.
Designating a permanent studio space allows you the option of painting a wall green and mounting your lights to walls or ceilings to eliminate light stands. You also get the benefit of being able to switch on quickly and get to work fast, which will increase your productivity.
You want the maximum separation of subject and background screen. This means you should orient your work space along the widest part of the room. Keeping your subject away from the background makes it easier to light each one separately and reduces the amount of green light reflecting onto your subject.
Sound Control
Sound control is another important element to consider in your studio space. If your room has a lot of echo, try hanging some heavy blankets over any large flat wall spaces (including behind the camera) to reduce the sound bouncing of the walls. Acoustic sound panels work great and there are a number of relatively inexpensive acoustic panel kits available for purchase. You can also build your own if you are more DIY minded and don’t mind a little extra work.
Mounting Your Lights
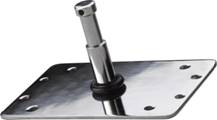 No matter which style of lighting equipment you choose for your home office green screen studio, I recommend adding some professional grade mounting plates to your studio. These are essentially metal plates with a mounting stud welded on. They can be mounted to walls or ceilings and provide a sturdy place to attach you light.
  They cost between $10-$15 each. There is also a ‘scissor’ mount that clips onto the channels of a drop ceiling. These are a great option if you are working in a conventional office space. You can mount the lights overhead and run the wires up into the ceiling.
Using these pieces of ‘grip gear’ let you free up floor space in your studio by removing light stands – which take up a huge amount of floor space and are always getting in the way. If you use mounting plates along with battery powered LED lights, you can have a complete professional quality studio with no floor stands or cables.
I personally use a Lowel Big-Foot mounting plate that is designed to attach to a drop ceiling scissor mount. My setup is a bit more expensive, but it gives me options when I shoot projects away from my home studio.